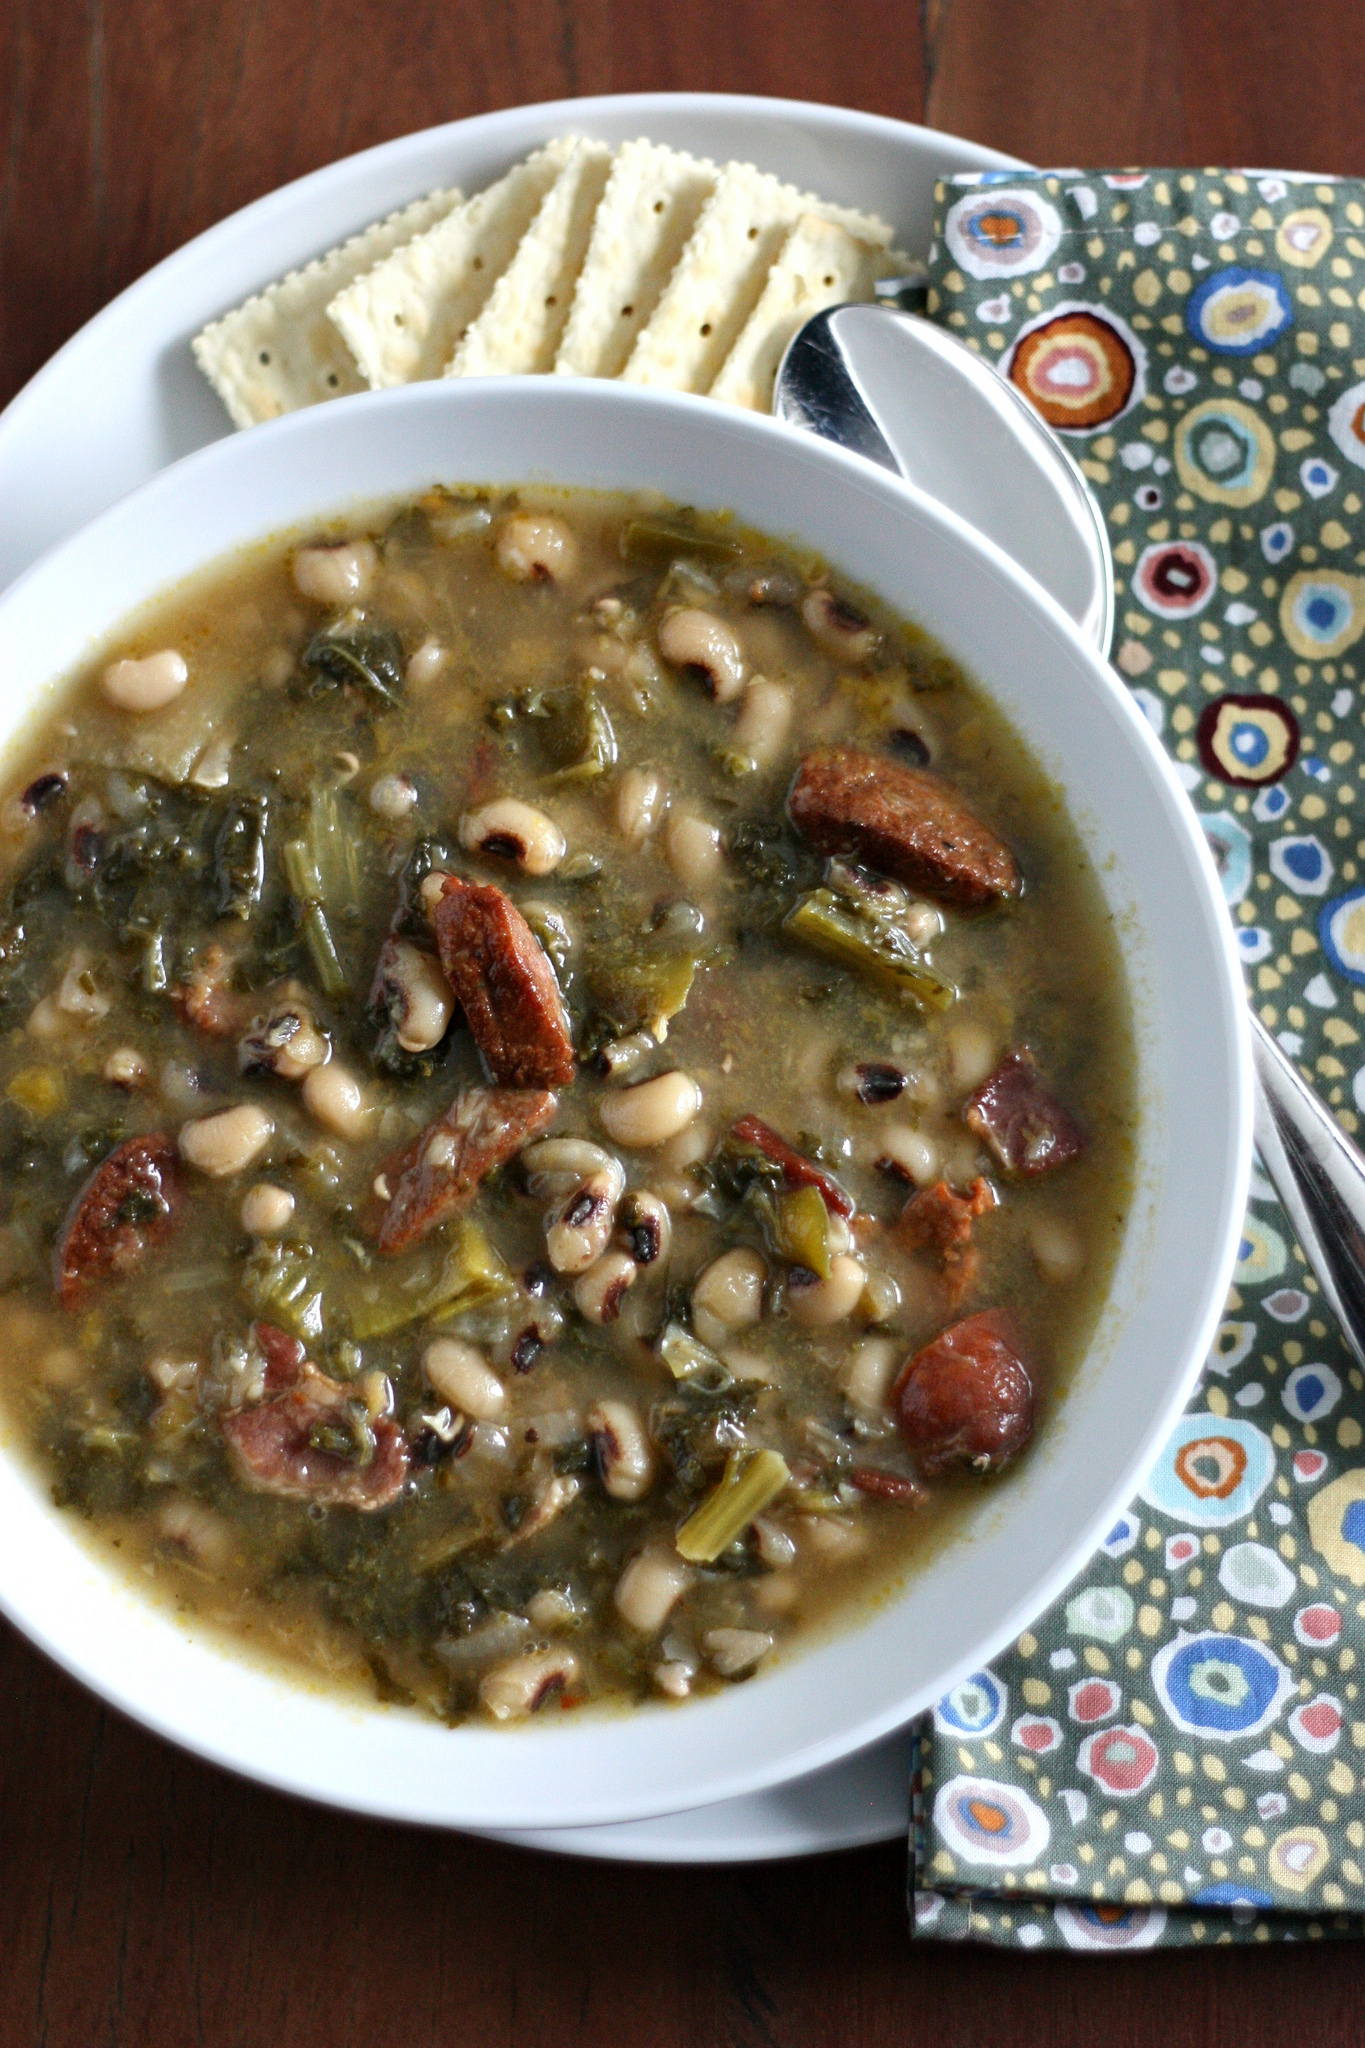
Healthy Beef & Vegetable Fried (Brown) Rice

September 26, 2012 · 3 comments

one hour payday loans

in asian,beef,healthy,quick and easy,rice and grains,vegetables

When I started college, my friends and I quickly found a local Chinese and Japanese restaurant that, in conjunction with beer, was probably the source of the Freshman 15 for a lot of people. I almost always ordered the chicken fried rice and what I loved about it was that, unlike “traditional” fried rice which often just had peas and carrots, this one was also loaded with snap peas and mushrooms.

I don’t order fried rice at Chinese restaurants nearly as often as I used to, just because I’ve found so many other dishes I enjoy, but I do make healthier versions of fried rice at home. I tend to use lean proteins like shrimp, chicken, or pork tenderloin, and I always stick to brown rice. This recipe caught my eye, not only because it uses beef—which I admit I’ve never done—but also because it uses oyster sauce, a flavor I love. I also really liked the addition of the bean sprouts with all the other veggies.

Stir fries and fried rice dishes don’t take very long to cook, but sometimes chopping all the ingredients can take some time. To help myself out, I cut the meat and vegetables in the morning, so those were ready to go. Everything moves pretty quickly so even if you don’t cut everything ahead of time, you will still want to make sure you do all  your chopping in the beginning. I’m usually a prep-as-other-things-cook kinda gal, but it doesn’t really work here.

This was a quick weeknight meal that was tasty,  nutritious, and filling. Plus, I already knew that Zachary loved sugar snap peas (he thinks the fact that there are tiny peas in the pod is both awesome and hilarious) but now I know that he’s also a pretty big bean sprout fan, too! The red peppers, though, forget it.


{ 3 comments }

I’m apparently of the mind that you can never have too many enchilada recipes. But if you notice, none of the recipes I’ve posted use beef as a filling, which is why I (obviously) needed to try yet another new recipe.

These enchiladas are not hard to make, but they do take some time. After you toast the chiles, they need to soak for about 30 minutes, so be sure to plan accordingly. The sauce also needs to simmer for about 15 minutes at the end. I like that this recipes soaks the chiles after they’re toasted, because it makes the sauce smoother (and easier to strain, should you choose to/need to strain it). Plus, using dried chiles just makes such a flavorful enchilada sauce.

I didn’t see any dried chipotles at the grocery store so I ended up just using a chipotle in adobo. I’m sure this added a bit more spice because of the adobo sauce, so just know that the recipe below does make a pretty spicy enchilada sauce. I love spice so it’s not an issue for me, but if you don’t, you may way to omit the chipotle. Either way a dollop of sour cream or Greek yogurt cools this right down.

My blender is in a really, really high cabinet in the way back. So, I don’t use it often and generally when a recipe calls for a blender, I tend to use my food processor instead. It usually works out alright, but I wouldn’t recommend it in this case - particularly if you are chatting on your phone and don’t notice the beef broth oozing out of your food processor and down your cabinets onto your floors. Lesson learned.

{ 11 comments }

I’ve mentioned a few times since starting my new(ish) job that I’m a big fan of make-ahead meals. Trying to cook during the week is hard enough as it is, but when you get home later than you’d like and have a toddler who starts getting ready for bed by 7:30, it becomes much more difficult.

There are few things that work better for make-ahead meals than baked pasta dishes. Generally, baked pasta dishes aren’t that difficult to make, but because they tend to have a few components, they can take some time. They’re usually not meant for a weeknight – or, at least, they can’t be a part of my weeknight meal repertoire – unless I’ve assembled them the day before.

This cannelloni/manicotti is a great make ahead meal. You can just assemble it and keep it covered in the fridge until you’re ready to bake it. The most time-consuming part of this for me was waiting for a large pot of water to boil. Is it just me (and my stovetop) or do you feel like you spend half your life waiting for water to boil?!

Anyway, I browned the sausage while the pasta was cooking, and then just added it to the rest of the filling. I did spread the manicotti noodles out on a lightly greased baking dish as I mixed the filling (and as I stuffed each piece) to make sure they didn’t get stuck together or tear.

I used manicotti noodles but you can use cannelloni or jumbo shells. Or, you can even just mix everything up with your favorite short pasta if you don’t feel like stuffing pasta. I used turkey sausage and part skim ricotta and mozzarella to keep this a bit lighter.

When I pre-make a meal like this, I don’t even bother preheating the oven. I actually think it works a little better, particularly if you’re going from fridge to oven, for the baking dish to warm up slowly, anyway.

Do you have any favorite make-ahead recipes?

Here are a few of our favorite make-ahead and crockpot meals:

Quinoa and Chicken Parmesan
Chicken, Mushroom, and Wild Rice Casserole
Short Ribs in Chipotle and Green Chile Sauce
Baked Burritos with Sour Cream-Poblano Sauce
Baked Ziti
Pasta with Chicken-Mushroom Ragout
Slowcooker Asian Pork (also great with chicken thighs or beef)
Slowcooker Smoky Pork Tinga Tacos with Avocado and Cheese
Slowcooker Mexican Shredded Beef for Tacos/Burritos
Slowcooker Italian Beef Sandwiches


This post is made possible by BlogHer’s Make Ahead Meals editorial series, made possible by Bank of America.

{ 9 comments }

I’ve been making this side dish about once per week for, oh, 5 or 6 years now, so I decided I should probably share it with  you.

I love bulgur and would venture to say it may be my favorite grain for many reasons. It has a slightly nutty flavor, and though it’s similar in size to couscous, has a little more chew and bite. It’s a whole grain that’s incredibly healthy, and takes a mere 15 minutes to make. A cup of cooked bulgur has about 60 fewer calories than brown rice but double the fiber (8g) and a little more protein, too (6g). And, quite honestly, it goes with…pretty much everything.

This is the most simple way I make it, which is just with a little onion and garlic, cooked in chicken broth, and topped with toasted almonds. The reason we have it so frequently (besides how quick it is) is that it’s both incredibly versatile and tasty.

Bulgur is also a great option for making one-dish meals or grain salads, too.


{ 12 comments }

I posted baklava French toast on my blog a long, long time ago. It got a great response and a few people made versions of it on their own blogs, which made me feel super warm and fuzzy inside since at the time I thought my blog was read by about 7 people.

But the post didn’t really have much of a recipe, just a method. And that’s fine, but the picture was also terrible and I wanted to highlight this again, anyway, because I love it.

The basic premise is taking the nut mixture that is found in baklava and sandwiching it between two pieces of eggy bread. I use tsoureki (still had some frozen from Easter), but challah or brioche will work equally well. After a quick egg/milk bath and getting fried on the griddle, the French toast is then topped with a honey-simple syrup mixture prevalent in a lot of Greek desserts.

This is definitely rich and very sweet, so if you like those kinds of breakfasts, this is totally your thing. It’s a great way to get the flavors of baklava without doing all the work—and it’s a good excuse to eat baklava for breakfast.

{ 13 comments }

This has been my favorite pizza crust for about a year, and I’ve totally been holding out on you guys. I’m so sorry! I love thin crust pizza, so of course the thin, crispy crust is a winner in that regard. What I also love about it is that it requires 24 hours of refrigeration before using, and no active rise time on the counter or anything. So, it works out well if you want to make the dough on a Saturday or Sunday and make the actual pizza early in the week. The dough comes together in no time at all.

When you make this crust (and yes, I said “when” and not “if”), you’ll want to keep the toppings pretty simple, so you don’t just overload it or make it too heavy. One of my favorite pizzas ever is margherita, and the toppings work pretty perfectly here, especially because tomatoes are so wonderful right now. I’ve often had margherita pizza with slices of fresh tomatoes and no real “sauce” and while I still adore those versions, I like that in this version the tomatoes are quickly run through the food processor. This way you have something more of a sauce, but it’s still fresh, uncooked, and all about the tomatoes.

One thing I can promise you is that no matter how long I have this blog and no matter how many pizzas I cook, I will never be able to get a round pizza. This was the closest I’d ever gotten. I rolled it into a near perfect circle – my geometry teacher would have been so proud. I don’t have a pizza peel, and I thought I’d devised a great new method for transferring the tough (super thin baking sheet with cornmeal, and a piece of parchment over less than half of it so I could yank it out once the dough made it to the stone. Yeah…no. It didn’t work. A quarter of my dough ended up hanging off the edge of the stone as I frantically tried to maneuver the whole thing over a few inches – always fun to do with a stone that has been sitting in a 500 degree oven for a while. Good times. I managed to get it all back on the stone, but certainly not in a perfectly shaped circle.

Thankfully, it doesn’t matter what shape your dough turns out—this pizza will always taste great.

{ 18 comments }

Blackberries grow near my in-laws and they pick them annually, so when my mother-in-law brought over some she’d frozen, they renewed my interest in making muffins. I used to make healthy muffins on a weekly basis, but for some reason that has fallen to the wayside (the reason, really, is my penchant for eating peanut butter toast in the mornings).

I had this recipe for Tuscan lemon muffins pinned, and I decided to add the blackberries to it because blackberries pair so well with lemon (well, any citrus, really). I healthified these by adding some whole wheat flour and reducing the sugar just a bit. I also added almond extract and upped the lemon juice. Lemon is in the moniker, after all, so it should be pretty prevalent in my opinion.

These are a bright, tart muffin and they come together very quickly. If you use frozen berries, don’t thaw them before stirring them into the batter. If you have a toddler, be amazed at the interest they have in dotting the batter in each muffin well with blackberries. :)

{ 4 comments }

I’ve been making this dish for over 5 years, but it’s never made it to the blog. (Well, a version of it sort of did in this chili casserole.) I’m either serving it for company and don’t take a picture, or I take a picture that turns out awful. Truth be told, I’m not all that crazy about these photos, either, but I didn’t want to wait any longer before sharing this with  you.

The original recipe for this pudding also has serrano ham and, though I’ve made it and loved it that way before, I generally omit the ham since I’m usually serving it alongside some sort of meat. The poblano peppers are enough to set this apart from your run-of-the-mill corn casserole, and I really love that masa harina is used (though I do substitute cornmeal for part of it, because I like the added texture).

I was not a huge fan of cornbread until I found a recipe I really liked, and I was not a huge fan of corn pudding/casserole until I made this version. I like that this dish is creamy, cheesy, and rich, but still has some texture from the bits of corn and pepper.

The recipe claims to serve 12, but that’s laughable. I’d say 6-8 is a better estimate. I often make half the recipe and if it doesn’t get polished off at dinner, it’s definitely gone by lunch the next day.  When I’m serving a large crowd, I generally 1.5x or double the recipe and cook it in my cast iron skillet.


{ 7 comments }

I’ve been craving pasta like crazy lately. I think part of it is that I’m ready for fall.  I’m ready for the homey, comforting dishes, the stick-to-your-ribs food, the sauces. The carbs.

But I’m trying to reconcile that with the fact that summer produce is pretty great – and still pretty prevalent. Despite having a drought in a lot of the US, it seems that everyone still has a lot of zucchini they’re looking to use up. This recipe will not only do that, but it will also bridge the gap between end-of-summer and so-ready-for-fall-and-pumpkins-and-apples-and-stews-I-could-burst.

Really, though, you can use any kind of vegetables in this you want. I liked the ones Jessica used, so I decided to stick with them. This recipe has made the rounds recently and has subsequently gone through a few adaptations. And who am I to keep it the same as the previous person? I ended up using a combination of half and half and chicken broth to keep this creamy, but still keep the fat down a bit. I also doubled the amount of roasted garlic and quite honestly could have easily tripled it, which I may go ahead and do next time. (Dear garlic: I love you.) I roasted the vegetables, since the oven was already on roasting garlic and chicken, so a lot of this dish was pretty hands-off.

Because a lot of the ingredients are the same, this reminded me of the Cajun chicken pasta, except of course the sauce is more garlicky than spicy. Basically, pasta + cream sauce will always win me over, no matter what time of year.

{ 11 comments }

Yep, that title is a mouthful, but so are these burgers. These start with a patty made of ground lamb and Greek spices and are then topped with one of my most favorite cheeses and caramelized onions – that are laced with figs and balsamic vinegar. Yup.

The burgers are more like meatballs than typical burger patties. They are made in a similar way to Greek keftedes, where the bread is soaked in milk and grated onion and an egg are added. All of these steps ensure a juicy burger. Then, you have the addition of oregano, parsley, and allspice – all common ingredients in Greek cuisine and ones I use myself to make my lamb burgers – packing the patties with flavor.

Figs are currently in season (hello, best time of the year), so I’d imagine you could use them in place of the dried figs here (skipping the soaking of course). They will likely break apart a bit more, but that just means more fig flavor in each bite. As it stands, though, the jam is great with dried figs and those are relatively easy to find year-round.

I made the onion-fig jam the night before, and mixed up the patty mixture in the morning before work so that when I got home, all I needed to do was shape and cook them. They turned out pretty perfectly and the leftovers were just as good. My husband actually got a few compliments (and maybe a few jealous looks) when he was eating his at work the next day.


{ 8 comments }