Meatless Monday: Thin Crust Pizza Margherita
18
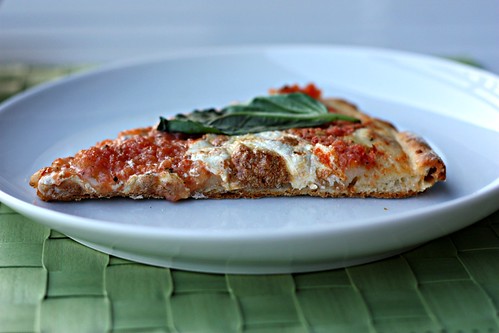
This has been my favorite pizza crust for about a year, and I’ve totally been holding out on you guys. I’m so sorry! I love thin crust pizza, so of course the thin, crispy crust is a winner in that regard. What I also love about it is that it requires 24 hours of refrigeration before using, and no active rise time on the counter or anything. So, it works out well if you want to make the dough on a Saturday or Sunday and make the actual pizza early in the week. The dough comes together in no time at all.
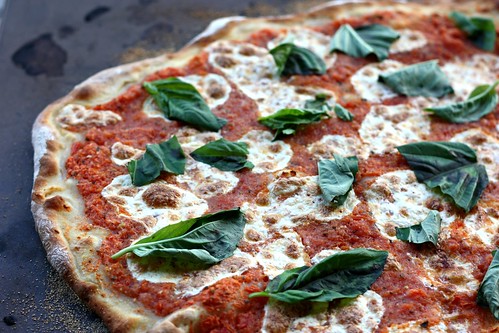
When you make this crust (and yes, I said “when” and not “if”), you’ll want to keep the toppings pretty simple, so you don’t just overload it or make it too heavy. One of my favorite pizzas ever is margherita, and the toppings work pretty perfectly here, especially because tomatoes are so wonderful right now. I’ve often had margherita pizza with slices of fresh tomatoes and no real “sauce” and while I still adore those versions, I like that in this version the tomatoes are quickly run through the food processor. This way you have something more of a sauce, but it’s still fresh, uncooked, and all about the tomatoes.
One thing I can promise you is that no matter how long I have this blog and no matter how many pizzas I cook, I will never be able to get a round pizza. This was the closest I’d ever gotten. I rolled it into a near perfect circle – my geometry teacher would have been so proud. I don’t have a pizza peel, and I thought I’d devised a great new method for transferring the tough (super thin baking sheet with cornmeal, and a piece of parchment over less than half of it so I could yank it out once the dough made it to the stone. Yeah…no. It didn’t work. A quarter of my dough ended up hanging off the edge of the stone as I frantically tried to maneuver the whole thing over a few inches – always fun to do with a stone that has been sitting in a 500 degree oven for a while. Good times. I managed to get it all back on the stone, but certainly not in a perfectly shaped circle.
Thankfully, it doesn’t matter what shape your dough turns out—this pizza will always taste great.

Thin Crust Pizza Margherita
Method for “sauce” from The Kitchn
1/2 recipe thin crust pizza dough (recipe follows)
2/3 lb. ripe tomatoes
1 clove garlic
1 large handful fresh basil, whole or sliced
5-6 oz. fresh mozzarella, thinly sliced
Adjust the oven rack to the second-highest position and place the stone on it. Heat the oven to 500 (if possible, keep the oven on for some additional time before baking the pizza – the longer the stone is in there, the better). Remove the dough from the refrigerator and set on a lightly oiled surface, loosely covered in plastic wrap, to reach room temperature.
Meanwhile, cut the tomatoes into wedges, and cut away the stem. Gently squeeze the wedges over a bowl to remove the excess seeds and juice. Combine the tomatoes, garlic, and 2-3 basil leaves in the bowl of a food processor or blender. Process until the tomatoes break down into a sauce. Season lightly with salt and pepper.
Transfer the dough to a well-floured work surface (or roll right onto parchment paper). Flatten the dough ball into an 8″ disc, leaving a slightly thicker edge around the rim. Using your hands (and a rolling pin, if necessary), stretch the dough to a 13″ circle. Transfer to a pizza peel or thin rimless baking sheet, if using to transfer to stone.
Lightly brush the edge of the dough with olive oil. Spread the tomato sauce over the pizza round and top with the mozzarella, leaving space between each piece of mozzarella.
Transfer the pizza to the hot stone and bake for 10-12 minutes, until the cheese is bubbly and the crust is nicely browned. Sprinkle with the basil and allow to cool for a few minutes before slicing and serving.
Thin Crust Pizza Dough
Yields two 13″ pizzas
From Cook’s Illustrated, as seen on Annie’s Eats
3 cups bread flour
2 tsp. sugar
1/2 tsp. instant yeast
1-1/3 cup ice water
1 Tbsp. vegetable or canola oil
1.5 tsp. salt
Combine the flour, sugar, and yeast in the bowl of a food processor fitted with a metal blade and pulse just to combine. With the machine running, add the ice water through the feed tube and process until all the dry ingredients are incorporated, about 10 seconds. Let the dough rest for 10 minutes.
Add the oil and salt to the dough; process until the dough forms a smooth, tacky ball that clears the sides of the bowl, about 30 seconds. Remove the dough and knead briefly on a lightly oiled work surface (about 1 minute). Transfer to a lightly oiled bowl, cover with plastic wrap and refrigerate for at least 24 hours and up to 3 days. (After the period of refrigeration, the dough can be wrapped and frozen for later use.)
That looks beautiful. I just saw the pizza episode on America’s Test Kitchen. I do have a question re: baking at the top of the oven. Is that for gas ovens? My oven is electric and the regular heating element is at the bottom. Just wondering….
P.S. I love your photos!
You know, Karen, I’m not totally sure. I will fully admit to missing that step entirely the first several times I’ve made this pizza and have baked it closer to the center of the oven and it’s been fine. I have an electric oven (gas stove). I think the more important thing is having a super hot stone.
Thanks Elly. I have the same set up and can never get a round pizza!
My favorite pizza crust to date is Mark Bittman’s but it’s not thin crust by any means! I do occasionally crave a good thin crust though so this is what I’ll be turning to next time that happens! And seriously…does anyone have any good tips on transferring pizza from the stone? It’s a near impossible task!
I use a pizza peel to transfer the uncooked pizza directly onto the stone and then use a pair of tongs to grab the edge of the cooked pizza’s crust to slide it back onto the peel to transfer it out of the oven and onto a wooden cutting board. Pizza peels are big wooden “spatula” type implements, it has a long wooden handle and a wide square wooden base that will hold a fairly large round pizza. You sprinkle the base with cornmeal or flour so the uncooked pizza doesn’t stick, and then using a flick of the wrist, slide the pizza directly onto the cooking stone in your oven.
I know what they are and would love to have one – I just don’t have the space for one. 🙂
Mmm gotta love pizza like this! It looks awesome!
I still think that the simple toppings make the best pizza. I often ordered just cheese, a margherita or pepperoni.
Thin crust is my absolute favorite, I cannot wait to try it.
I love this crust too! Definitely better than all other recipes I’ve tried.
I used to have a lot of trouble getting my pizza on my stone, but I have found a method that works for me. I cut a round of parchment paper that is the same size as my stone – and I put the dough on this and pull/slide it onto the stone off a cutting board. After a few minutes, I take it out and top it, and slide it back on the stone without the parchment – after cooking a few minutes it is stiff enough to not flop all over. For me, it is much less stressful! I also re-use the parchment at least 10 times 🙂
I love this recipe, too. I made it last week when I had a craving for caprese pizza. I’ll probably make it again next week!! YUM!
This is Pizza!
I’ve found it hard to get as thin of a crust as I’d like at home, so I’ll have to try this recipe! Margherita pizza is one of our favorites too 🙂
Pizza Margherita is one of my favorites, too!! This thin crust looks like the perfect match.
Have you ever tried just leaving the parchment paper under the pizza dough? I cook mine right on the paper. The edges get pretty dark (obviously) but it works! Plus I have a strange obsession with burnt brown parchment paper. Haha.
I’ve tried it and it’s turned out well, but I’m really stubborn and want to get it ON the stone. Hah.
A simple thin crust pizza is one of my favorite things. I will have to try this crust recipe sometime.
Love a thin crust pizza Elly…and thank you for sharing your version. I must try this dough rather than the usual “leave and rise for an hour” types.
I have a pizza peel, and I still have trouble transferring the pizza onto the baking stone. Usually, one side hangs off with toppings and cheese dripping into the oven. The pizza looks yummy – will have to try that crust recipe!